In my previous blog, we discussed to add a custom new metric in Akka HTTP application. If you are looking to expose the promethesu metrics in an Akka HTTP application, please go through to this blog.
Here, in this blog we will discuss to add a custom label in the existing merics. Few days ago, I got a requirement to add a new label to the existing metrics. Let’s discuss that.
The solution was not the straight forward. I had to rewrite a few library classes and then was able to add the custom new label. I was looking to add userId label.
First, we need to rewrite the PrometheusRegistry class and need to follow the below steps
Add userIdLabel to the labels variable:
  private val labels: Seq[String] = {
    val methodLabel = if (settings.includeMethodDimension) Some(MethodDimension.Key) else None
    val pathLabel = if (settings.includePathDimension) Some(PathDimension.Key) else None
    val statusLabel = if (settings.includeStatusDimension) Some(StatusGroupDimension.Key) else None
    val userIdLabel = Some("userId")
    (methodLabel ++ pathLabel ++ statusLabel ++ userIdLabel).toSeq
  }
Add userIdDim to the dimensions:
 response.foreach { r =>
      // compute dimensions
      // format: off
      val methodDim = if (settings.includeMethodDimension) Some(MethodDimension(request.method)) else None
      val pathDim = if (settings.includePathDimension) Some(PathDimension(pathLabel(r))) else None
      val statusGroupDim = if (settings.includeStatusDimension) Some(StatusGroupDimension(r.status)) else None
      val userIdDim = Some(UserIdDimension(userIdLabel(r)))
      val dimensions = (methodDim ++ pathDim ++ statusGroupDim++ userIdDim).toSeq

      active.dec()
      responses.inc(dimensions)
      duration.observe(Deadline.now - start, dimensions)
      if (settings.defineError(r)) {
        errors.inc(dimensions)
      }
      r.entity.contentLengthOption.foreach(sentBytes.update(_, dimensions))
    }
Both the above things have been added in a newly written class PrometheusRegistryCustom.
Then, need to define the UserIdLabelHeader class as follows:
final case class UserIdLabelHeader(value: String) extends ModeledCustomHeader[UserIdLabelHeader] {
  override def renderInRequests = false

  override def renderInResponses = false

  override val companion = UserIdLabelHeader
}

object UserIdLabelHeader extends ModeledCustomHeaderCompanion[UserIdLabelHeader] {

  val UnKnown: UserIdLabelHeader = UserIdLabelHeader("UnKnown")

  override val name = "x-userid-label"

  override def parse(value: String): Try[UserIdLabelHeader] = Success(new UserIdLabelHeader(value))
}
Then, need to define the marshaller for PrometheusRegistryCustom class as follows:
trait PrometheusMarshallersCustom {

  val PrometheusContentType: ContentType = {
    MediaTypes.`text/plain` withParams Map("version" -> "0.0.4") withCharset HttpCharsets.`UTF-8`
  }

  implicit val marshaller: ToEntityMarshaller[PrometheusRegistryCustom] = {
    Marshaller.opaque { registry =>
      val output = new StringWriter()
      try {
        TextFormat.write004(output, registry.underlying.metricFamilySamples)
        HttpEntity(output.toString).withContentType(PrometheusContentType)
      } finally {
        output.close()
      }
    }
  }
}

object PrometheusMarshallersCustom extends PrometheusMarshallersCustom
Then, need to define a class (CustomHttpMetricsDirectives) which overrides the HttpMetricsDirectives:
trait CustomHttpMetricsDirectives extends HttpMetricsDirectives {

  def userIdLabel[L](userId: String): Directive[Unit] = {
    extractRequestContext.flatMap { _ =>
      mapResponseHeaders { headers =>
        val userIdHeader = UserIdLabelHeader(userId)
        headers :+ userIdHeader
      }
    }
  }
}

object CustomHttpMetricsDirectives extends CustomHttpMetricsDirectives
At last, there is a class PathLabelHeader which is getting used in PrometheusRegistryCustom class but since this class is private to a particular package so we can not access that. So for that, we have to define a new custom class similar to the PathLabelHeader with different name as PathLabelHeaderCustom:
final case class PathLabelHeaderCustom(value: String) extends ModeledCustomHeader[PathLabelHeaderCustom] {
  override def renderInRequests = false

  override def renderInResponses = false

  override val companion = PathLabelHeaderCustom
}

object PathLabelHeaderCustom extends ModeledCustomHeaderCompanion[PathLabelHeaderCustom] {

  val Unhandled: PathLabelHeaderCustom = PathLabelHeaderCustom("unhandled")
  val UnLabelled: PathLabelHeaderCustom = PathLabelHeaderCustom("unlabelled")

  override val name = "x-path-label"

  override def parse(value: String): Try[PathLabelHeaderCustom] = Success(new PathLabelHeaderCustom(value))
}
Now, use the PrometheusRegistryCustom class in MetricController instead of PrometheusRegistry as follows:
MetricsController.scala
val registry: PrometheusRegistryCustom = PrometheusRegistryCustom(collector, settings)In the main Api class, use userIdLabel directive as follows:
def userRoute: Route = get {
path("user") {
parameters('userId) { userId =>
userIdLabel(userId) {
complete(StatusCodes.OK, "This is an application to add a custom metrics")
}
}
}
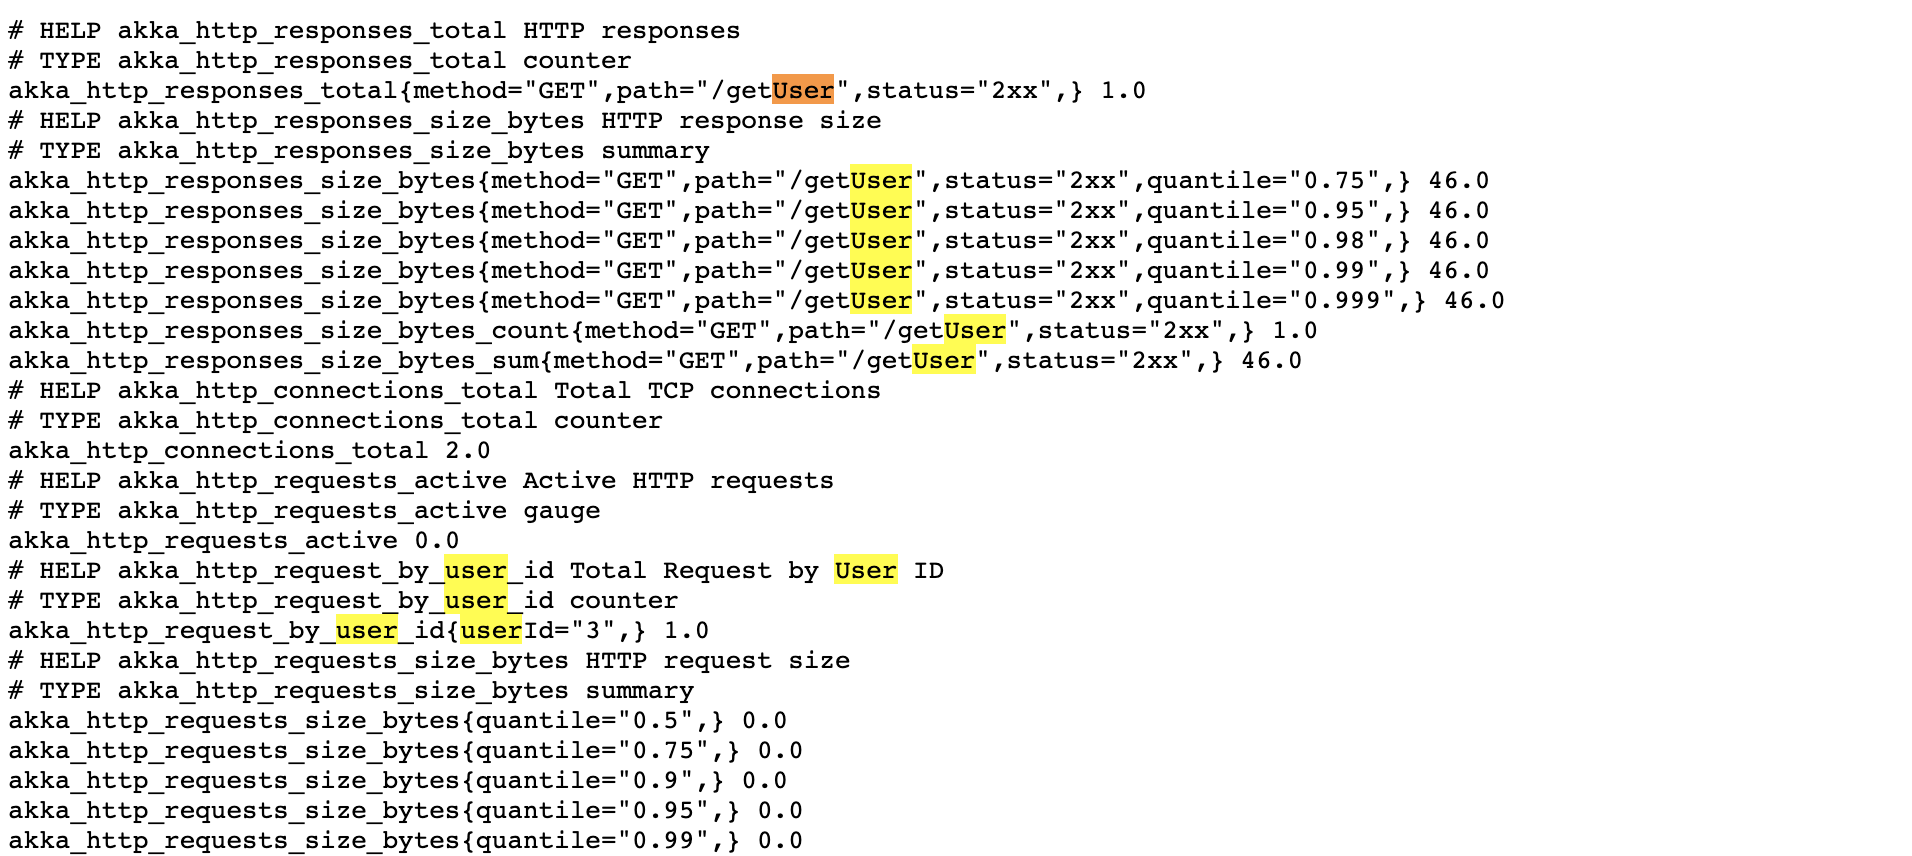
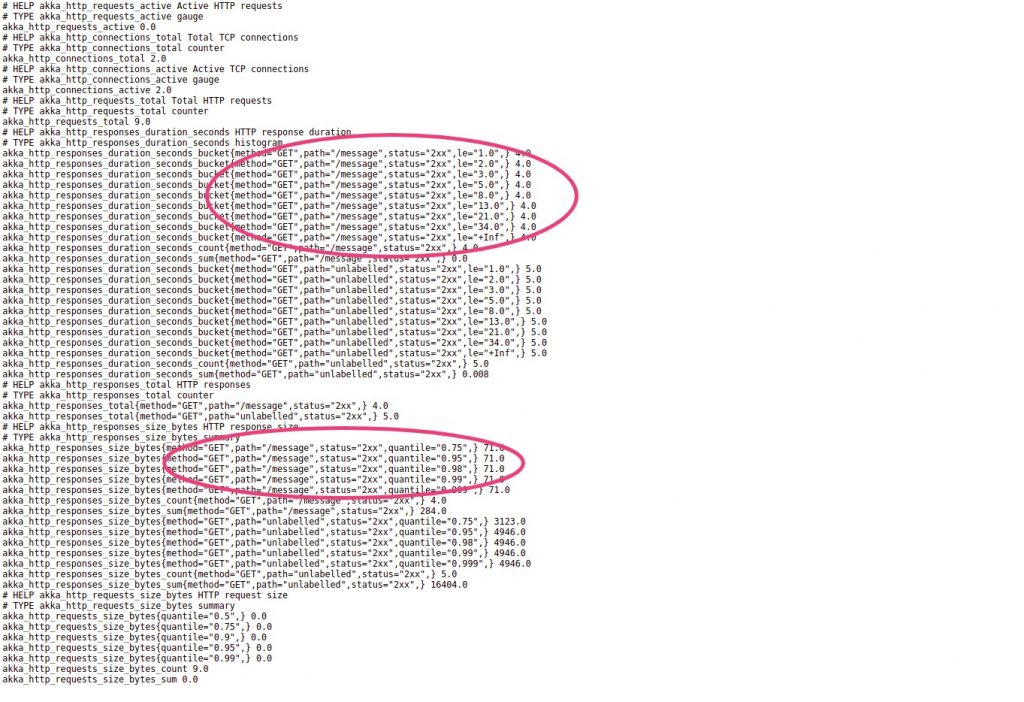
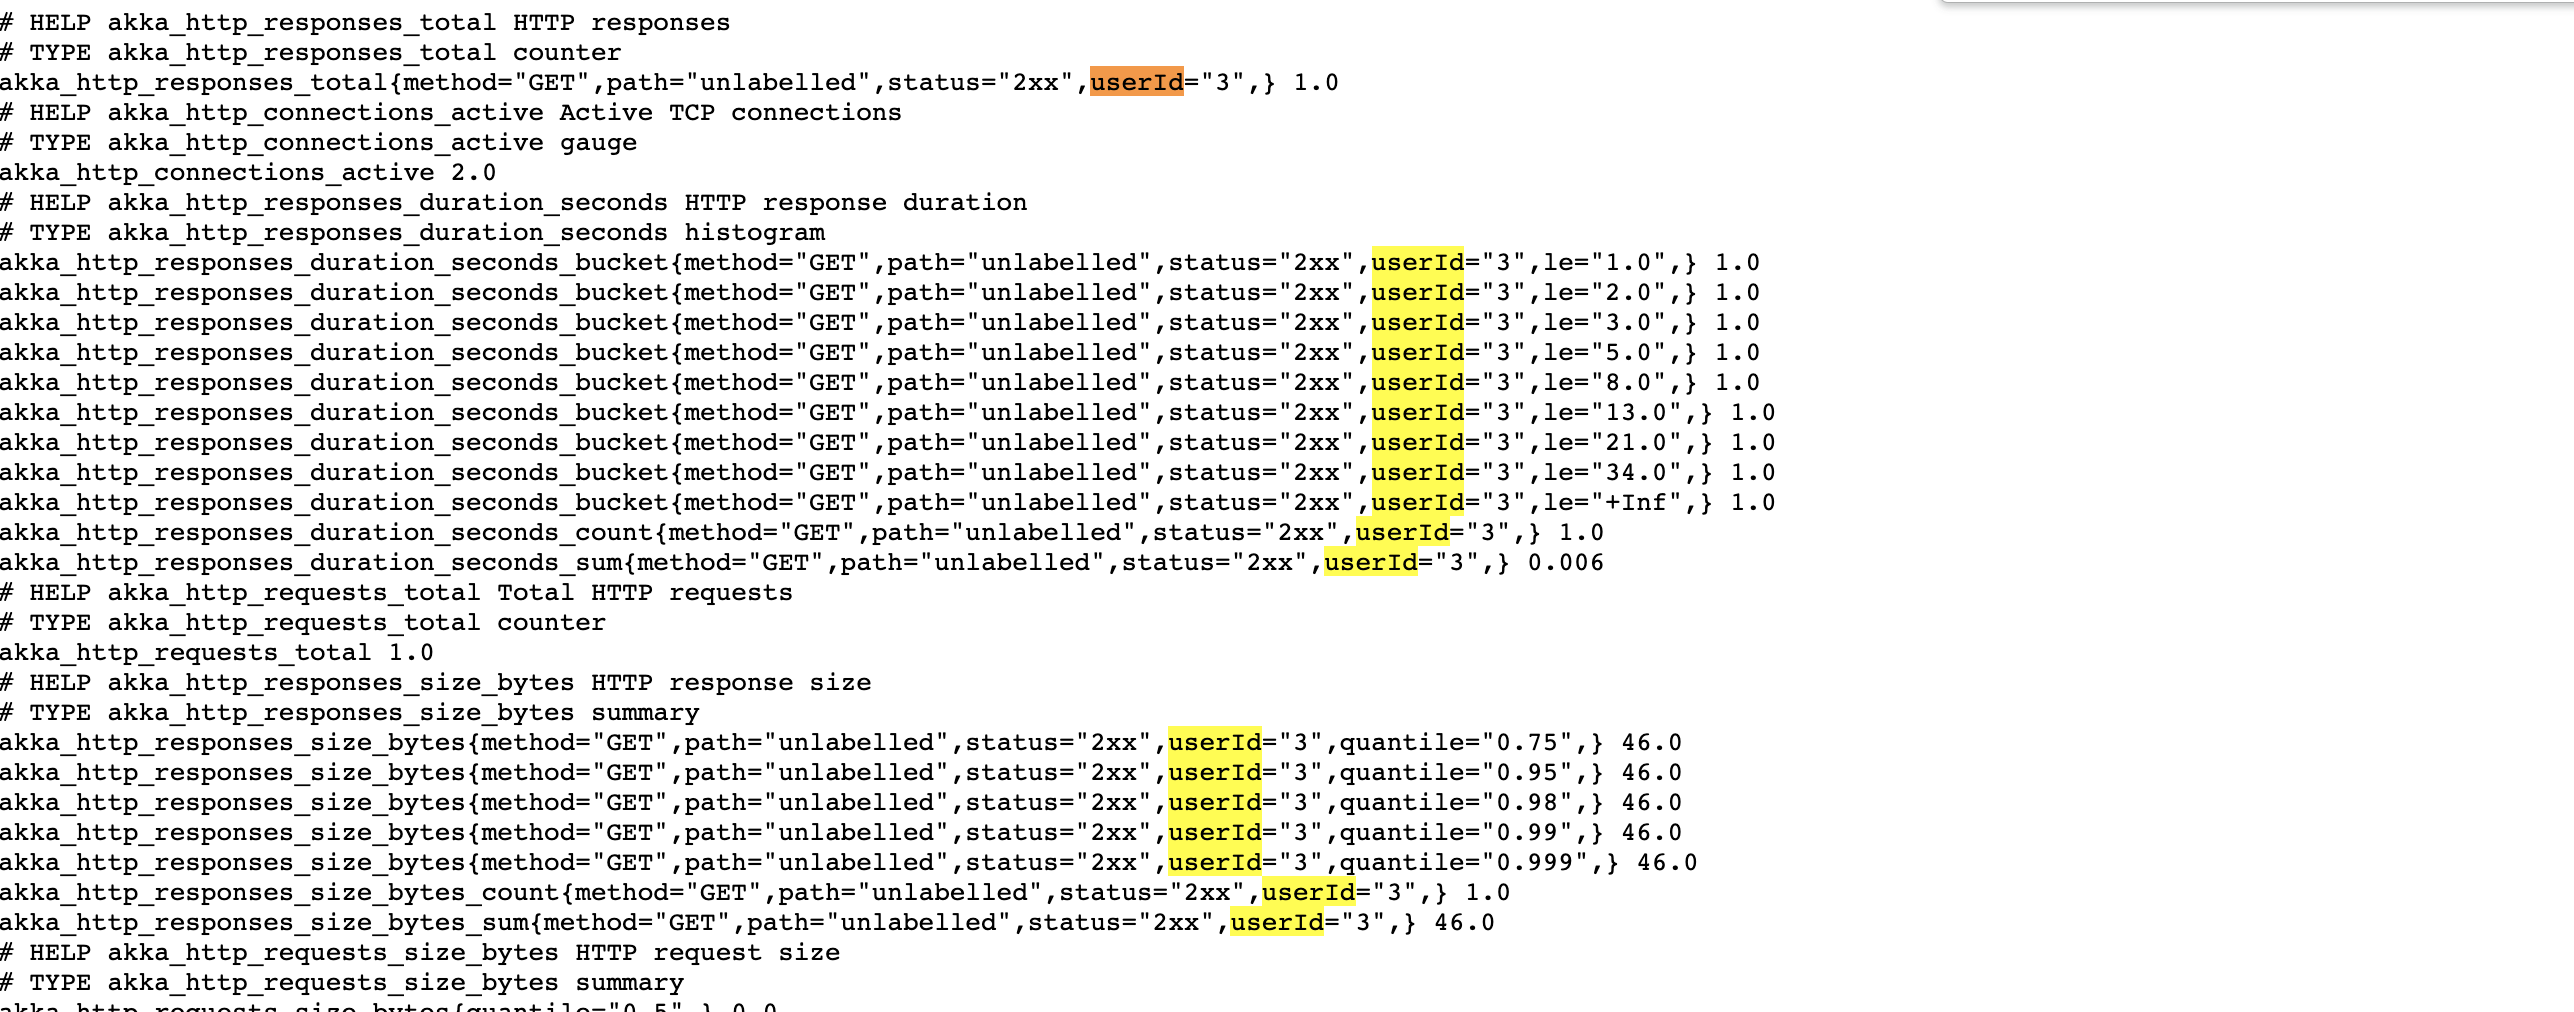
}Now, run the application and hit the url “http://localhost:8080/user?userId=3” and then check the metrics at this url “http://localhost:8080/admin/prometheus/metrics”
That’s it. I hope this will be really helpful for you guys.
Checkout here to get the full working code.